Export Airtable to Google Sheets
Export Airtable to Google sheets automatically and on a schedule
Airtable is a powerful platform for hosting dynamic business data that is constantly changing. Exporting Airtable to Google Sheets automatically is important for backing up your data and performing extra analysis. This guide will demonstrate how to do it with CSV Getter, a powerful Airtable export tool.
Create an Airtable export URL
Login to CSV Getter and on your Account Settings, press Connect Airtable if you have not done this yet.

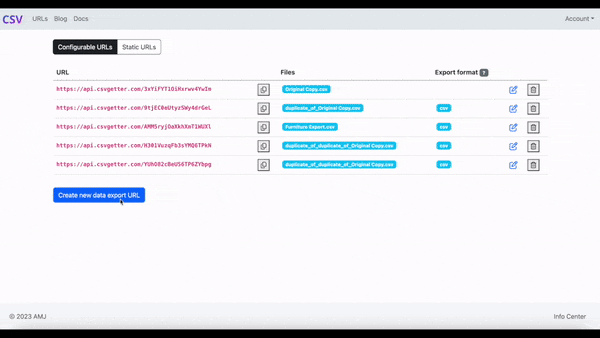
Now that you have authenticated, you can generate an Airtable export URL. This can be done in the CSV Getter UI. Simply select the table you want to export using the dropdown screen, name your file, and select fields. The default export for this URL will be a CSV file with the columns you have selected in the CSV Getter UI. You can change these settings at any time to adjust the output of your export.
Now you have created an Airtable export URL, there are many ways to proceed from this point. This blog is going to focus on Google Sheets as the next step.
Export Airtable to Google Sheets
Google Sheets offers custom script building which can be leveraged for importing data on a specific schedule.
Open a Google Sheet and click Extensions from the top tab. Under the Extensions drop down, click App Script.

You will then see the App script editor screen. In your Code.gs file, paste the following code:
function csvGetter() {

// URL of the CSV file [REPLACE WITH YOURS]

var url = "[Your export URL]";

// Fetch the CSV file

var response = UrlFetchApp.fetch(url);

// Get the contents of the file as a string

var csvString = response.getContentText();

// Convert the CSV string to a 2D array

var csvData = Utilities.parseCsv(csvString);

// Get the active sheet

var sheet = SpreadsheetApp.getActiveSheet();

// Clear the existing data in the sheet

sheet.clear();

// Write the data from the CSV file to the sheet

sheet.getRange(1, 1, csvData.length, csvData[0].length).setValues(csvData);

}
Make sure you replace the in-place export URL with your own. You can do this by replacing [Your export URL] with your export URL.
The code, when run, will overwrite the current Google sheet with the latest Airtable data.

Saving the Code.gs file, you can now run the function called csvGetter. (You may need to give this script permission to access the sheet. I explain this in the video above.)

Once you have run the function ... Congratulations! 🎉 - your Google Sheet will now be full of your Airtable data.

Schedule Exporting Airtable to Google Sheets
You can use the Triggers menu to schedule when the script runs. A trigger is a method of running your code automatically. We can use the Triggers menu to create a time-driven trigger to automatically export Airtable to your Google Sheet.
Back in the Apps Script screen, click Triggers (the alarm clock icon)

Click "Add trigger".

Under trigger settings, click "Time Driven" - this allows you to customise how often the trigger is run.

Once you press save, your Trigger will be live 🎉. You can see its working by waiting for a 'Last Run' timestamp to appear.

And now your Google Sheet is updating automatically from Airtable.
Get notified by Airtable export
You can also stay notified when your export is completed successfully by adding the email_me to your CSVGetter URL.
Including the email_me parameter will show you exactly when the process was completed. The process can be labelled with the optional email_tag parameter so that you or your organisation can know that a backup process was completed at, say, 9 am and that the Airtable data was exported to your Google Sheet.
The email includes a copy of the Airtable export URL used. This can remind you to download your data locally, daily, to have a fully comprehensive backup solution.